Django CMS Plugins with selectable template ...

Published at October 9, 2011 | Tagged with: , , , , ,

... or how to reuse your plugins inside sections with different design

Problem: Frequently on the websites I am developing I need to display same set of data in several different ways. For example if I have a news box that needs to appear in different sections of the website e.i. in sidebar, main content etc. Using Django CMS plugins make this quite easy.
For simplicity we will take the following case. An image/text tuple with two layout variations - image on left of text and image on right.
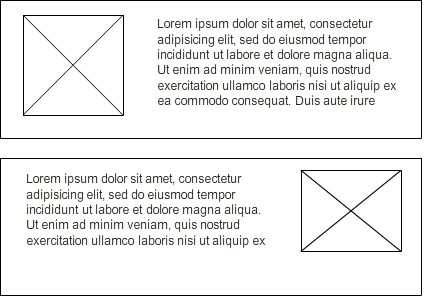
Django CMS Plugins

Same data but different layout. All you need to do is just to allow your users to change the plugin template according to their needs. If you don't have experience with Django CMS Plugins I advice you to check how to create custom Django CMS Plugins before you continue with solution.

Solution: First you will have to create a tuple holding your templates(and their human readable names) and add a field that will hold the chosen template to the plugin model.


#models.py
PLUGIN_TEMPLATES = (
  ('image_on_left.html', 'Image on left'),
  ('image_on_right.html', 'Image on right'),
)

class SamplePlugin(CMSPlugin):
    # your plugin properties here
    template = models.CharField('Template', max_length=255,
                                choices = PLUGIN_TEMPLATES)

Now it is time to tweak the template render method too:


#cms_plugins.py
class CMSSamplePlugin(CMSPluginBase):
    model = SamplePlugin
    name = 'Sample plugin'
    render_template = PLUGIN_TEMPLATES[0][0]
    
    def render(self, context, instance, placeholder):
        if instance and instance.template:
            self.render_template = instance.template
        #your stuff here
        return context

Final words: Yep, this is all. Simple isn't it? It is amazing how sometimes such small things are so useful. If you are having bigger difference in the layout of your templates you will probably have to put a little more stuff in the context that some of your templates may not need but it is OK. Feel free to comment and if you are using this "trick" please add your use case - it will be interesting to see in how many different cases this works.

Neil Gaiman's Anansi Boys...

Published at October 2, 2011 | Tagged with: , ,

... an unexpected gift and unexpected dedication

YOU KNOW HOW IT IS. You pick up a book, flip to the dedication, and find that, once again, the author has dedicated a book to someone else and not you.

Not this time.

Because we haven't yet met/have only a glancing acquaintance/are just crazy about each other/haven't seen each other in much too long/are in some way related/will never meet, but will, I trust, despite that, always think fondly of each other...

This one's for you.

With you know what, and you probably know why."

This is how Neil Gaiman's Anansi Boys starts.

About a week ago I spent few days in Greece. One day we were sitting under the shadow of a near bar when something grabbed my attention. Next to the bar there was a book shelf with something special on it:
Neil Gaiman's Anansi Boys

It was really strange to go in a foreign country, in unknown place and there a few meters away from me standing out with its black cover to see a book of one of my favourite authors. So I just took my camera, go there and take a shot on it.

The bartender asked me what am I shooting so I explained to him that it was a surprise for me to see that book. He took it as he was seeing it for a first time in his life, took a brief look at it and asked me whether I have read it. I said that unfortunately I am not. Then he took another look at the book and gave it to me as a gift. I took and open it and... it was starting with the dedication from the top of this post.

Coincidence? Maybe... or maybe not.

It is always a pleasure for me to discover pieces of art, no matter whether I am travelling or not, no matter is it an ancient castle or a book, it is great.
I haven't still finished the book but it looks amazing. I really recommend it as any other Gaiman's book. Hopefully I'll meet Neil one day till than(and after) I'll keep reading.
So if you are reading this go travel, or read books, or both. Have fun and share your experience.

Language redirects for multilingual sites with Django CMS ...

Published at September 11, 2011 | Tagged with: , , , , , , , ,

... or how to avoid duplicate content by keeping the current language in the URL

Preface: Earlier this year I posted about Django CMS 2.2 features that I want to see and one of the things mentioned there was that once you have chosen the language of the site there is no matter whether you will open "/my_page/" or "/en/my_page/" - it just shows the same content. The problem is that this can be considered both duplicate and inconsistent content.
Duplicate because you see the same content with and without the language code in the URL and inconsistent because for the same URL you can get different language versions i.e. different content.

Solution: This can be easy fixed by using a custom middleware that will redirect the URL that does not contain language code. In my case the middleware is stored in "middleware/URLMiddlewares.py"(the path is relative to my project root directory) and contains the following code.


from cms.middleware.multilingual import MultilingualURLMiddleware 
from django.conf import settings
from django.http import HttpResponseRedirect
from django.utils import translation

class CustomMultilingualURLMiddleware(MultilingualURLMiddleware): 
    def process_request(self, request):
        lang_path = request.path.split('/')[1]
        if lang_path in settings.URLS_WITHOUT_LANGUAGE_REDIRECT:
            return None
        language = self.get_language_from_request(request) 
        translation.activate(language) 
        request.LANGUAGE_CODE = language
        if lang_path == '': 
            return HttpResponseRedirect('/%s/' % language)
        if len([z for z in settings.LANGUAGES if z[0] == lang_path]) == 0:
            return HttpResponseRedirect('/%s%s' % (language, request.path))

Now a little explanation on what happens in this middleware. Note: If you are not familiar with how middlewares work go and check Django Middlewares. Back to the code. First we split the URL by '/' and take the second element(this is where our language code should be) and store in lang_path(8). URLS_WITHOUT_LANGUAGE_REDIRECT is just a list of URLs that should not be redirected, if lang_path matches any of the URLs we return None i.e. the request is not changed(9-10). This is used for sections of the site that are not language specific for example media stuff. Then we get language based on the request(11-13). If lang_path is empty then the user has requested the home page and we redirect him to the correct language version of it(14-15). If lang_path does not match any of the declared languages this mean that the language code is missing from the URL and the user is redirected to the correct language version of this page(16-17). To make the middleware above to work you have to update your settings.py. First add the middleware to your MIDDLEWARE_CLASSES - in my case the path is 'middleware.URLMiddlewares.CustomMultilingualURLMiddleware'. Second add URLS_WITHOUT_LANGUAGE_REDIRECT list and place there the URLs that should not be redirected, example:


URLS_WITHOUT_LANGUAGE_REDIRECT = [
    'css',
    'js',
]

Specialties: If the language code is not in the URL and there is no language cookie set your browser settings will be used to determine your preferred language. Unfortunately most of the users do not know about this option and it often stays set to its default value. If you want this setting to be ignored just add the following code after line 10 in the middleware above:


if request.META.has_key('HTTP_ACCEPT_LANGUAGE'):
    del request.META['HTTP_ACCEPT_LANGUAGE']


It removed the HTTP_ACCEPT_LANGUAGE header sent from the browser and Django uses the language set in its settings ad default.

URLS_WITHOUT_LANGUAGE_REDIRECT is extremely useful if you are developing using the built in dev server and serve the media files trough it. But once you put your website on production I strongly encourage you to serve these files directly by the web server instead of using Django static serve.

Final words: In Django 1.4 there will be big changes about multilingual URLs but till then you can use this code will improve your website SEO. Any ideas of improvement will be appreciated.

Retrieving Google Analytics data with Python...

Published at September 6, 2011 | Tagged with: , , , , , , ,

... or how to pull data about page visits instead of implementing custom counter

Preface: OK, so you have a website, right? And you are using Google Analytics to track your page views, visitors and so on?(If not you should reconsider to start using it. It is awesome, free and have lost of features as custom segments, map overlay, AdSense integration and many more.)
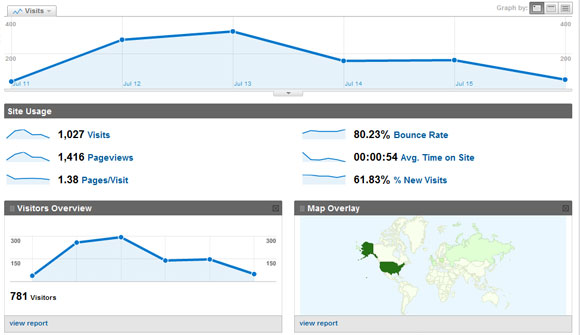
So you know how many people have visited your each page of your website, the bounce rate, the average time they spend on the page etc. And this data is only for you or for a certain amount whom you have granted access.

Google Analytics

Problem: But what happens if one day you decided to show a public statistic about visitors on your website. For example: How many people have opened the "Product X" page?
Of course you can add a custom counter that increases the views each time when the page is open. Developed, tested and deployed in no time. Everyone is happy until one day someones cat took a nap on his keyboard and "accidentally" kept the F5 button pressed for an hour. The result is simple - one of you pages has 100 times more visits than the other. OK, you can fix this with adding cookies, IP tracking etc. But all this is reinventing the wheel. You already have all this data in your Google Analytics, the only thing you have to do is to stretch hand and take it.

Solution: In our case "the hand" will be an HTTP request via the Google Data API. First you will need to install the Python version of the API:


sudo easy_install gdata

Once you have the API installed you have to build a client and authenticate:


SOURCE_APP_NAME = 'The-name-of-you-app'
my_client = gdata.analytics.client.AnalyticsClient(source=SOURCE_APP_NAME)
my_client.client_login(
    'USERNAME',
    'PASSWORD',
    source=SOURCE_APP_NAME,
    service=my_client.auth_service,
    account_type = 'GOOGLE',
)

token = my_client.auth_token

SOURCE_APP_NAME is the name of the application that makes the request. You can set it to anything you like. After you build the client(2) you must authenticate using your Google account(3-9). If you have both Google and Google APPs account with the same username be sure to provide the correct account type(8). Now you have authenticated and it is time to build the request. Obviously you want to filter the data according some rules. The easiest way is to use the Data Feed Query Explorer to build your filter and test it and then to port it to the code. Here is an example how to get the data about the page views for specific URL for a single month(remember to update the PROFILE_ID according to your profile).


account_query = gdata.analytics.client.AccountFeedQuery()
data_query = gdata.analytics.client.DataFeedQuery({
    'ids': 'ga:PROFILE_ID',
    'dimensions': '', #ga:source,ga:medium
    'metrics': 'ga:pageviews',
    'filters': 'ga:pagePath==/my_url_comes_here/',
    'start-date': '2011-08-06',
    'end-date': '2011-09-06',
    'prettyprint': 'true',
    })

feed = my_client.GetDataFeed(data_query)
result = [(x.name, x.value) for x in feed.entry[0].metric]

Final words: As you see it is relatively easy to get the data from Google but remember that this code makes two request to Google each time it is executed. So you will need to cache the result. The GA data is not real-time so you may automate the process to pull the data(if I remember correctly the data is updated once an hour) and store the results at your side which will really improve the speed. Also have in mind that this is just an example how to use the API instead of pulling the data page by page(as show above) you may pull the results for multiple URLs at once and compute the feed to get your data. It is all in your hands.
You have something to add? Cool I am always open to hear(read) you comments and ideas.

Update: If you are using Django you should consider to use it Memcached to cache these result as shown in Caching websites with Django and Memcached

Foreign key to Django CMS page ...

Published at July 14, 2011 | Tagged with: , , , , , , , ,

... how to make usable drop-downs with Django CMS pages

Problem: some times when you create custom applications or plugins for Django CMS you need a property that connects the current item to a page in the CMS. Nothing simple than this - you just add a ForeignKey in your model that points to the Page model and everything is (almost)fine. Example:


from cms.models import Page

class MyModel(models.Model):
    # some model attributes here
    page = models.ForeignKey(Page)    

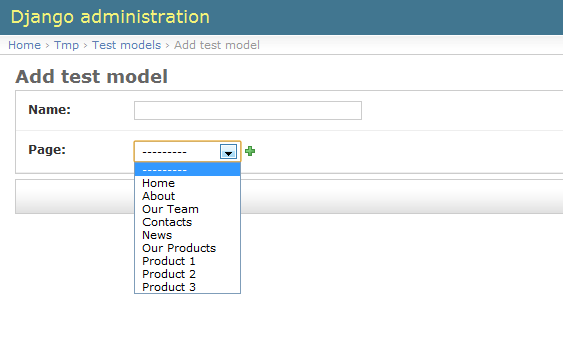
If you registered your model in Django admin or just add a model form to it you will see something like this:

Django Admin Screenshot

Cool right? Not exactly. The problem is that these pages are in hierarchical structure and listing them in a flat list may be/is little confusing. So let's indent them accordingly to their level in the hierarchy. Solution: The easies way to achieve this indentation is to overwrite the choices list of the ForeignKey field in the ModelForm __init__ method.


class MyModelForm(forms.ModelForm):
    class Meta:
        model = MyModel
    
    def __init__(self, *args, **kwargs):
        super(MyModelForm, self).__init__(*args, **kwargs)
        choices = [self.fields['page'].choices.__iter__().next()]
        for page in self.fields['page'].queryset:
            choices.append(
                (page.id, ''.join(['-'*page.level, page.__unicode__()]))
            )
        self.fields['page'].choices = choices 


The magic lies between lines 7 and 11, on line 7 we create a list with one element the default empty option for the drop down. The need to use "__iter__().next()" comes from the fact that the choices attribute of the fields is django.forms.models.ModelChoiceIterator object which is iterable, but not indexable i.e. you can not just use self.fields['url'].choices[0].
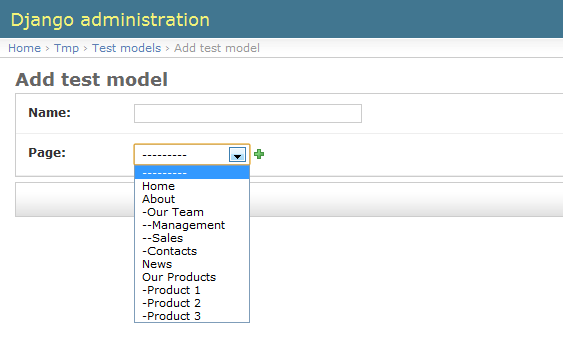
After we had the empty choice now it is time to add the real ones, so we iterate over the queryset(8th line) that holds them and for each item we add a tuple to our choices list(10). The first item of the tuple is the page id - nothing special, but the second one... here the python magic comes. We multiple the minus sign('-') by the page level and join the result with the page title. The only thing left is to replace the field choices(line 12) and here is the result:

Django Admin - usable drop-down

Final words: For me this is much more usable than the flat list. Of course you can modify the queryset to return only published pages or filter the results in other way and still use the identation code from above.
I'll be happy to hear your thoughts on this.